When you hire a tour guide, it’s an exciting occasion because they bring a new skill set and unique personality to your tours and activities. For this reason, you may be eager to start them on wowing your guests right away. But before they bungee jump into the role, it’s best to give them proper tour guide training first — which means you have to be their tour guide for your tour business.
On top of showing them around and making introductions, there’s plenty of tasks to teach them — like how to ask guests for Tripadvisor reviews and how to use your tour operator booking software. Luckily, Checkfront is user-friendly, so it doesn’t take long to pick up the latter.
However, that doesn’t mean you should overlook this task, or walk through it quickly. Think about it this way — your front desk is often the first impression guests have of your tour business. Whether it’s checking in or making a reservation, guests expect and appreciate a seamless experience, so running the front desk is one of most the important skills of a tour guide.
And the lobby can be a busy place. At any given time, lots can happen at once — like greeting guests, handing out equipment, answering the phone, and booking walk-ins. By showing your tour guide how to use Checkfront most efficiently, you can help them juggle everything while maintaining quality customer service.
There are three ways your tour guide will use Checkfront daily:
- Take bookings
- Manage bookings
- Welcome bookings
So we break down the steps for each with the shortest click paths. That way, you can teach them everything they need know, and the fastest way to complete each task in Checkfront.
To get started, you can watch Ryan’s video above, download our Checkfront training checklist, or keep on reading:
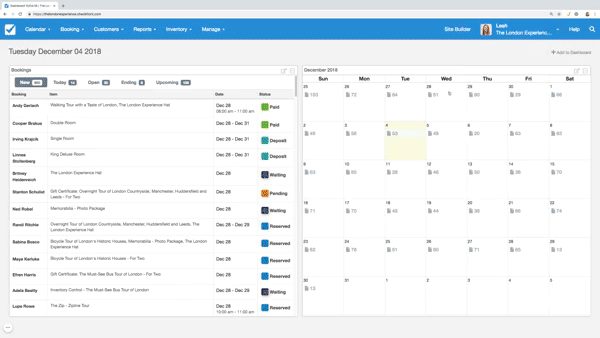
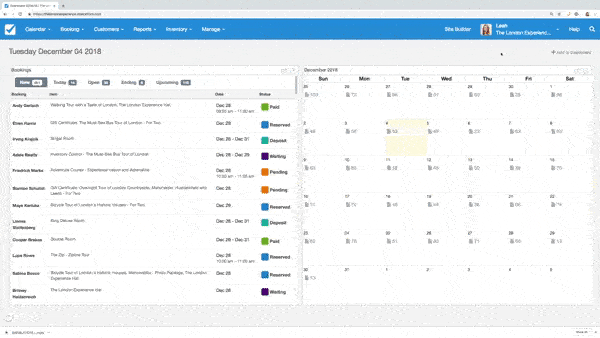
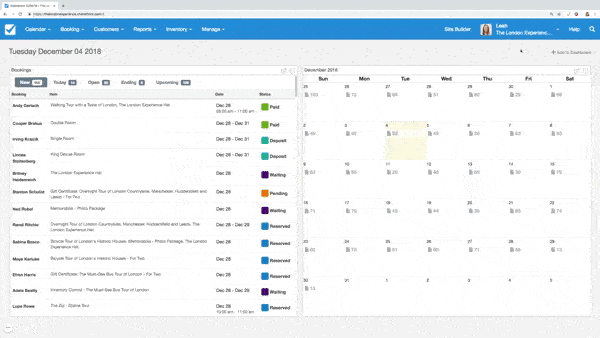
Start by optimizing the Checkfront dashboard
Since the dashboard is the central hub of information and the first screen your tour guide sees after logging in, it’s a great starting point for many tasks. But it needs to be optimized with the right widgets first.
What are widgets?
Widgets are tiles that display a summarized view of another area in Checkfront. With them, your tour guide can perform multiple actions without using the main menu.
Every account can configure the dashboard layout differently. While you may want to see widgets like Booking Volume or Revenue by Month, your staff account should display the following:
- Bookings – shows current and upcoming bookings
- Calendar – shows number of bookings each day
And you can do this by:
- Clicking on the +Add to Dashboard found in the top right
- In the pop-up window, select Bookings and Calendar
- Hit Close and your new widgets will be displayed

*Note: When you hover over a widget, you’ll see a four-headed arrow cursor, which will allow you to move the widget on the dashboard. That way, your tour guide can customize their layout to display the above widgets first.
Now that you have the dashboard setup, you can begin training your tour guide:
Create a new booking
While most guests book online, some might prefer a walk-in or phone booking. When that happens, your guide can quickly create a new booking by following these steps:
- Click on the day in the Calendar widget for when the guest wants to book (to get to the next month, hit the fullscreen icon on the top right of the widget)
- Select New Booking
- On the Staff Booking Page, select the desired tour (the green button shows how many spots are available)
- Select the time, and enter in the number of adults and children
- If the guest has a voucher, select Apply Promo or Voucher, enter the discount code and hit Apply
- Click Continue
- On the next page, follow the script for phone bookings to convince the guest to add another item. If successful, select Add to Booking on the top and repeat above steps.
- In the booking form, enter the guest’s information and hit Continue
- For payment over the phone, select Pay Now on the bottom right of the invoice (remember to review their booking details first).
- In the Add Payment pop-up window, enter credit card information
- Check Send Email Notifications — most guests like payment confirmationIf they have a gift certificate, click on the Gift Certificate tab and enter the code
- Hit Process
- To send every guest email notifications — including signing the digital waiver — collect guest information by:
- Click on Complete Guest Details on the bottom right of the invoice
- Select Add a Guest under Guest ListCheck the items the guest will participate in and hit Submit
- Enter the Guest information — Name and Email
Manage Bookings
Once your tour guide creates a booking, changes still might need to be made before the guest arrives — including the unfortunate cancellation of a booking.
Here is how to make the following changes:
Add a new item
- Find the guest using the search bar
- On the invoice page, select the Edit tab
- Select Add Item on the left sidebar
- Use the Category and Item drop down menu to find the right tour
- Hit Save
Cancel Booking
- Find the day of the booking in the Calendar
- Click on the paper icon — which will have a number next to it to represent number of bookings
- In the pop-up window, click on the correct name under the Booking column
- You’ll be taken the Booking Invoice
- Under Booking Invoice, use the drop-down menu and select the red Cancelled button
If the guest has paid and wants to cancel, you’ll have to issue a refund:
Issue a Refund
- On the Booking Invoice page, select the Transactions tab
- Click on the red Refund button
- Next to Type, select the payment method
- If it’s not a cash refund, check Send Email Notifications so the guest gets confirmation of the refund
- Hit Refund
Check-in/Check-out Guests
When guests arrive, they’re excited to start the adventure. That’s why the check-in process should be short and sweet. Here are the steps to make that happen:
- Find the guest by typing in their name in the search bar
- On the new page, click on the Invoice tab
- Then hit Check-In or Check-out located on the left sidebar
You can also get everything ready for guests ahead of time with the Daily Agenda. Here’s how to use this page:
- Go to the Booking drop-down menu and select Daily Agenda
- The sheet will default to Today’s date, but you can change the booking date with the calendar button at the top
- Use the Category drop-down to filter out bookings from other categories
- All the bookings scheduled for that day will be listed
- To see important information for each guest, use the arrows on the far left to expand
- Click on the Export button to print the list and use it as a reference to get everything ready
Final thoughts
Tour operator booking software can be intimidating at first. But Checkfront is easy and doesn’t take long to adopt — especially after following the above steps for each task. Soon enough, your tour guides will be making bookings and checking-in guests quickly, which means they can get right to showing your guests an outstanding time.
Want to make front desk training a little easier?

Give your guides a training checklist to follow.
This checklist outlines the steps for every task at the front desk. Save, print, and share it with your new guides to use.