
A traveler visits your tour and activity website for many different reasons — like to compare prices, get ideas for an upcoming trip or learn more about your business. While you want them to book with you, they have a wide range of intentions. That’s why it’s challenging to align their actions with your ultimate goal. But there’s good news! It’s possible with granular, yet pivotal tweaks to your booking process.
You might already know how to use your website to make a great first impression— like responsive design, fast loading time, simple navigation and clear calls-to-action. But even when a traveler decides to take action and book, they can leave at any point if the booking process is too tricky.
To increase travel conversion rates, it’s essential to have the best booking site design that matches a traveler’s actions every step of the way. What does that look like for tour and activity operators?
In this article, we break it down for you. Let’s get started:
Setting up a travel booking process
1. Research your target audience
Before designing your booking process, consider your target audience. Who do you want to attract? Where do they live? What’s the purpose of their travels? Are they traveling solo or with a group?
Discovering these answers will help you understand your average guest — their needs, goals and online behaviour — which will give you an idea of how to successfully lead similar personas down the booking funnel.
Start with observing the first question your guests ask over the phone. Do they immediately want to know the price? Or what times and dates are available?
The first question you answer over the phone should be the first question you answer online.
For example, if you often hear, “do you have a tour available on this date?”, then you should have an availability calendar as the first step in the online booking process.
Quick tip: Display a book now CTA in the header of the homepage to make for easy navigation. That way, travelers visiting your website with the sole intention of making a reservation can do so quickly — which is handy for those booking with a mobile device.
2. Include a browse page for specific tours
It’s likely you have more than one tour and activity for a guest to choose. While it seems like a good idea to list everything on the homepage, it can be overwhelming for visitors — especially if they’re just browsing.
Instead, you should break your items into categories. In doing so, you’ll help a traveler who has a general idea of what they want, find a specific tour they’re eager to book.
List the categories on your homepage, and then take the visitor to a browse page of that category depending on which one they select.
As an example, let’s look at The London Experience which offers a variety of tours and activities that make a traveler’s trip to London special.
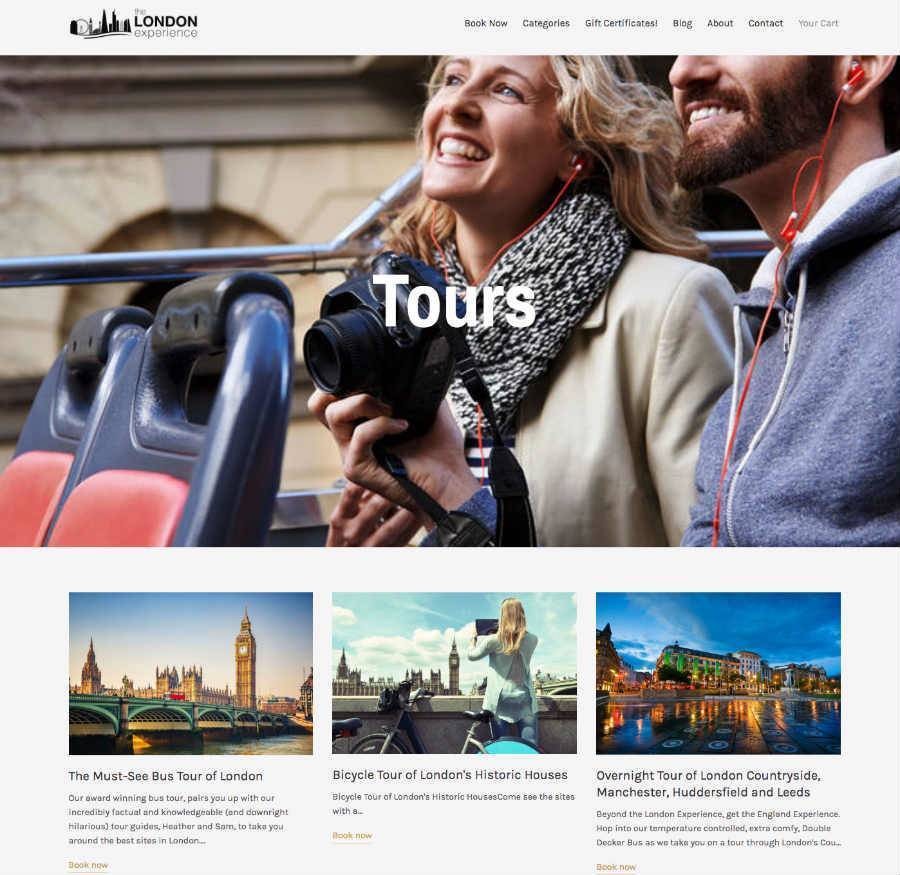
Let’s say a traveler is only interested in booking a tour. With a tour category page, a traveler can narrow down their decision by selecting from only the tour items. Now, there’s a better chance they’ll find something that appeals to them and fits with their itinerary.
Quick tip: List five or fewer options on every category page. Visitors might find too many choices exhausting when trying to make the best decision for their travels.
3. Lead down the booking funnel
Once a visitor has decided on a tour, it’s best to lead them quickly down the booking funnel. If they want to book, then you shouldn’t delay them any further with unnecessary information.
During a phone booking, there are specific details you’ll ask a guest right away — like “how many adults and children,” or “what time do you want to go?” Online booking works the same way.
Have the guest tell you the date, time, and the number of guests before adding the tour to the cart. These details should be big, clickable buttons that pop out on the page.
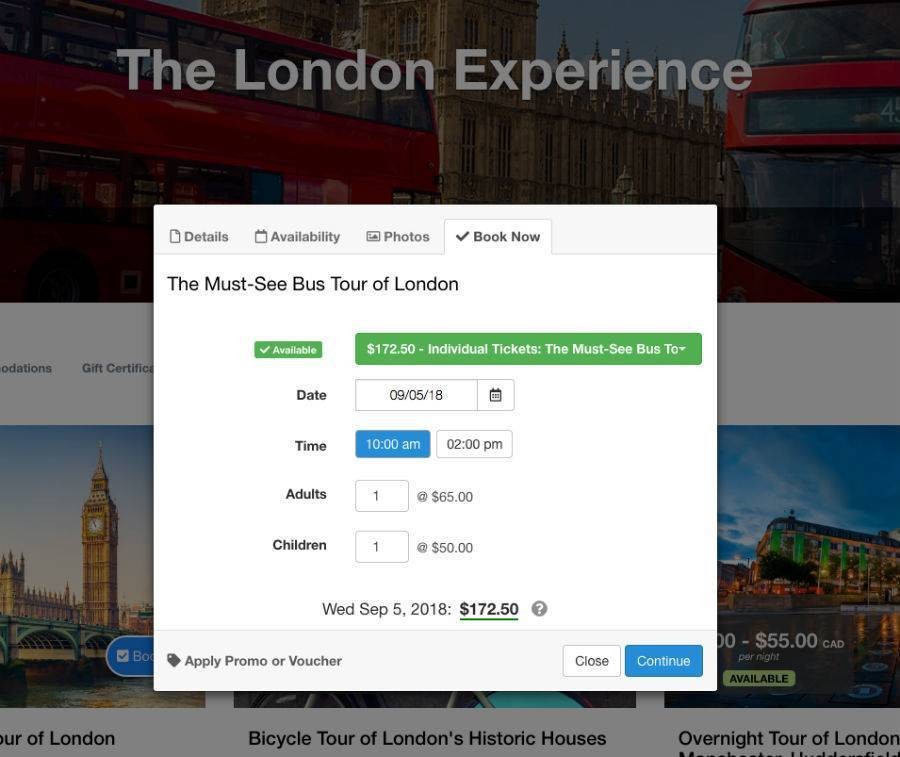
Quick tip: Think of your target audience when it comes to the language you use. For example, instead of using the term quantity, use something that is more relevant to your business — like guests, adults, players, etc.
After they finish, present them with the subtotal (in the currency of their home country) and then make the Add to Cart button easy to identify and click. Again, think of your language here — try something like Book Now instead.
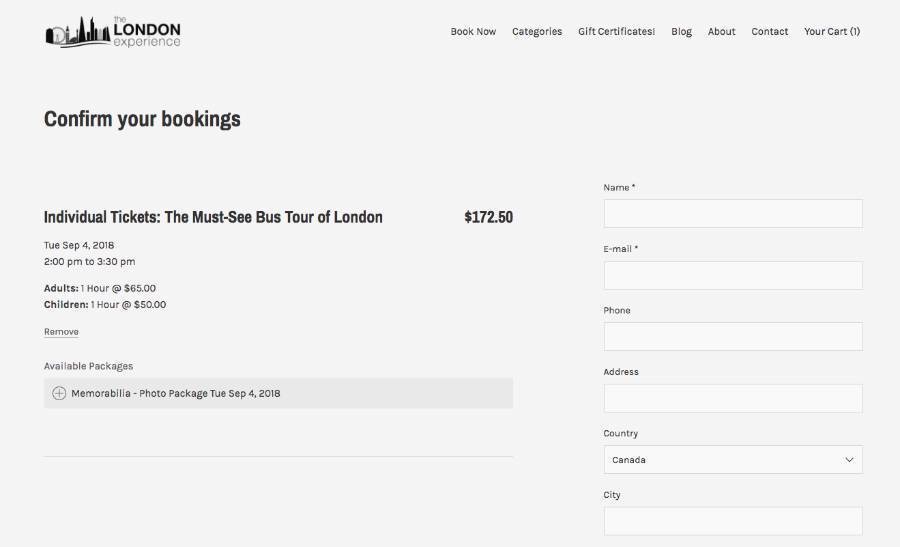
4. Upsell on the booking form
At this point, you’ve attracted a traveler enough to become a guest. Now, it’s time to delight them by providing an option that will boost their experience.
With a booking form, it’s best to show the details again so the guest can make sure everything is correct. While they’re looking this over, present them with other add-ons. It’s likely they want their tour to be unique — which means there’s an opportunity to get them to add to their booking.
But don’t just present them with anything from your list of offerings. Think about what will make their tour special.
For example, let’s say a guest has chosen to do your hiking tour in the hottest time of the year. If they’ve had previous hiking experience, they likely know how warm they’ll be after a few hours of switchbacks (or you can tell them that in the tour description).
So it’s a great idea to offer them something additional that will allow them to cool off afterwards — like a canoe trip and dip. If the add-on compliments their initial tour, they’ll be more tempted to include it in their booking — which means a bigger sale for you.
Quick tip: Keep the required fields on the booking form to a minimum. Ask them only what’s necessary — like name and contact information. Too many form fields are a turn-off, especially for mobile users. If you need more details from them, you can collect it on the guest form after check-out.
5. Avoid adding extra fees on the invoice
A visitor isn’t necessarily hooked when they reach the invoice. They haven’t paid yet. There’s still a chance they’ll cancel their actions.
But why would someone abandon the cart so close to the end? Especially after taking the time to find a tour and fill out the form?
One reason is that the final invoice contains additional fees. Extra payments are often unexpected and might confuse the guest, or worse, cause them to feel distrust.
Not all surprises are good ones. That’s why it’s best to include the fees in the subtotal from the beginning.

What if the fee is unavoidable — like a fuel surcharge? Well, you can treat it like a charitable donation. Be transparent about the add-on by explaining what it’s about. Customers are more likely to accept a fee when they understand the reason.
Quick tip: Make sure any discounts stand out on the invoice. That way, if the visitor is wondering if there are any deductions — like an early bird discount— you already answer the question for them.
6. Send an automatic confirmation email
A customer gets an instant receipt when they purchase a product at the store. For online booking, it should be no different. Money is a point of tension and worry. Most guests want a booking confirmation and proof of payment right away.
There’s a huge cause for concern when the confirmation is delayed, or there isn’t one at all. The guest might email you a dozen times to make sure everything is good to go or show up thinking everything is, when in fact, it’s not. Both these scenarios make for a poor experience before the actual experience.
A booking confirmation lets both you and the customer know the booking is valid. It’s also an excellent opportunity to build rapport by thanking the guest for choosing your tour. Or give them another chance to review the booking details, so they don’t arrive with a curveball like, “oh…we actually wanted two gluten-free lunches.”
Quick tip: You can save time at check-in by also sending a built-in digital waiver with the receipt. That way, your guest can sign it online at any time before arrival.
It’s time-consuming to send confirmation emails manually. But with Checkfront, you can set up emails to send automatically — while keeping it personal for every booking.
7. Collect guest information after payment
Long lines at check-in are a pain for everyone. Instead of handing out paper forms at reception, it’s best to let guests fill out the form online. That way, everyone can jump right into the adventure as soon as they arrive.
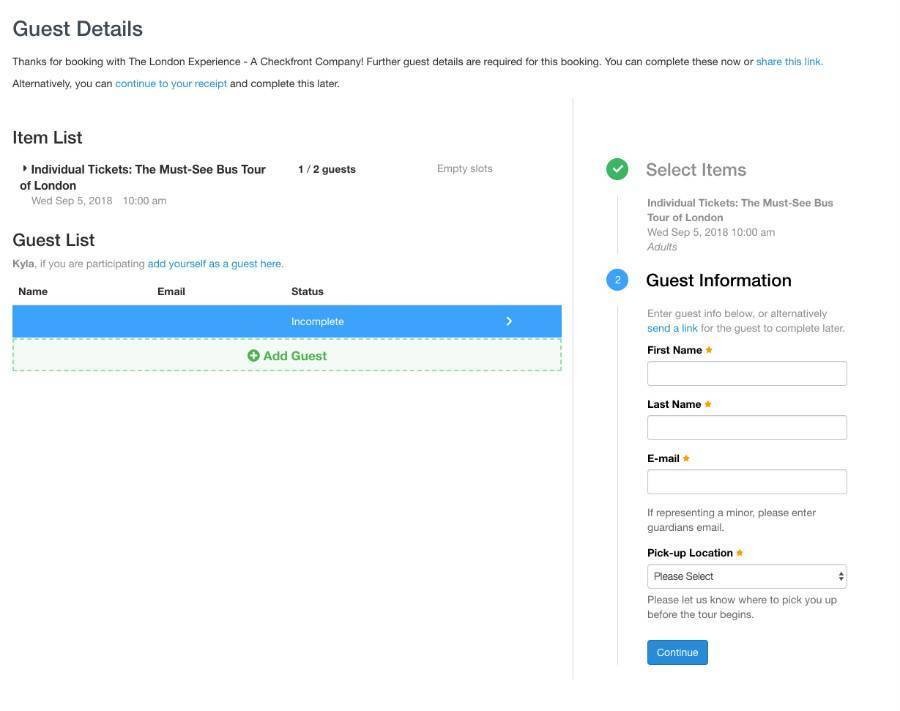
Since a guest form takes time to submit, present it after the reservation is completed to avoid disrupting the booking flow. Give two options to the person making the booking:
- Enter the information for each guest.
- Send a link for guests to complete later.
At this point, the booking has been made, and there’s time for guests to submit their details.
Quick tip: Make sure to ask for information relevant to the tour and activity — like height, weight, dietary restrictions, etc. With Checkfront’s Daily Manifest, you can get an overview of guest details for any booking and prepare ahead of time with the information received.
Final thoughts
A smooth and straightforward booking flow is essential for getting more online sales. Just remember to track and analyze the changes you make until you find a booking flow that works for you.
PS. Checkfront comes with the best booking flow for tour websites.

Start your free 21-day trial!
Online bookings. Flexible pricing. Outstanding support.